|
|
ABLe Broadcasting, Inc.
Collection of Computer and Other Tips Linksys
LNE100tx PCI Ethernet Card I spent
some time today looking for an updated driver for one of my LAN cards and
came up blank. I have a diskette
for this card which doesn’t contain a more recent driver that Win/XP
will load over this one. This
one doesn’t make me happy since it doesn’t provide settings that
let me disable the “Wake on LAN Event” feature. But at least it works. I
don’t own this driver. I
don’t know where it came from.
If anyone wants to claim ownership and objects to my having it posted,
please let me know. I’ll be
happy to provide you credit, take it down, link to another site… It
just seems to be needed. Here it is. The file name is
“an983.sys”. Shutdown,
Hibernate As
you can tell from this web site, I shut my machines down at night to save
power. I use the Start Button /
Control Panel / Scheduled Tasks facility to do that. To shut down nightly, I create a task
that runs at the desired time with the command line: C:\WINDOWS\system32\shutdown.exe
-s -f -t 30 To
make the computer hibernate nightly, I use the following command: C:\WINDOWS\system32\rundll32.exe
powrprof.dll,SetSuspendState Hibernate Fast User
Switch I run
a number of services (HTTP, etc.) on my machine, so I wish to have my profile
logged into the computer constantly.
So when I leave the machine, and to allow others access to the server,
I use the following command to quickly invoke the Switch User feature. I also have a shortcut for this
command on my desktop. c:\windows\system32\rundll32.exe
user32.dll LockWorkStation Restart
after Shutdown I’ve
had some trouble in the past with my computers restarting right after
shutting down or hibernating.
I’ve traced this to the Ethernet card’s “Resume on
LAN” feature. Essentially,
my LAN cards remain on-line while the computer is “soft off” and
can be woken up when called over the LAN. To fix this I disable this feature
everywhere I can, including in the BIOS, in the network card’s device
configuration settings, and in the Power Management screen on Control
Panel. Look to see if your
computer’s lights go off on the hub or router its connected to when your
machine powers down. If the light
remains lit, it means your LAN card is still powered and at risk. My machine with the LNE100tx
doesn’t get to full off state, but I’ve turned enough of the
feature off that it no longer wakes up from LAN activity. TPLink TL-WA850RE WiFi Range Extender Initially
I found these devices very unreliable.
They frequently stopped allowing devices to connect to my home network
through them. That’s bad,
of course, since that’s the entire point of them. To
address this I used my browser and logged into each one by browsing to the IP
address of each device and entering the access name and password. In the Wireless / Wireless
Advance settings menu I cleared the “Enable WMM” check box. The help text on the web page says
that WMM is some kind of packet priority scheme, highly recommended
“on”. For me,
“off” (or unchecked) works better. Belkin®
WeMo Light Switch One
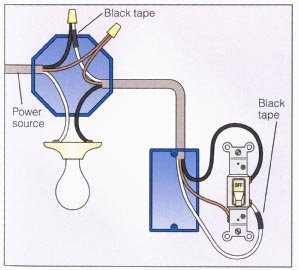
time I’ve had to install a WeMo Light Switch in a box that is wired as
a load first switch wring, as: Basic 2-Way Circuit - Power Coming In At Light
This is a common wiring configuration since it reduces the number of feet of cable needed to do a switch-first wiring. Some web sites claim that this wiring configuration is against contemporary electrical codes, but I don’t know the code (even for my own area). Belkin says that you can’t wire a WeMo Light Switch in this configuration. And maybe you can’t. But…at your own risk, maybe you can. If you know how to handle wiring, and you’re smart enough to turn power off to the box and test it before working on it, you can try to wire one WeMo switch black wire to the incoming line black or white, and the other WeMo switch black wire to the outgoing line black (doesn't matter which). Then, connect the WeMo switch/white (neutral) and the WeMo switch/green (ground) both to the box ground. The box ground is usually a bare piece of copper that connects to the wall of the box. This may trip a GFI circuit as those allow only a very small amount of WeMo current to escape to ground. The
more common problem for me is that the WeMo Light Switches are very deep and
getting them and the wires back into the box takes a good deal of force. Belkin®
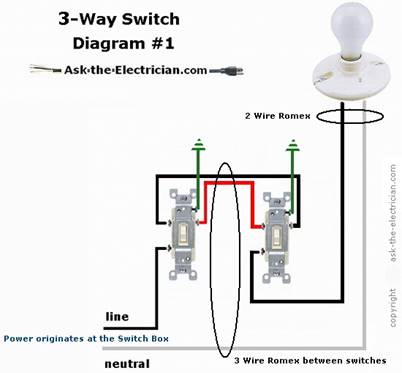
WeMo Three-Way Light Switch I
went to install a 3-way Belkin switch, only to find that my house doesn’t
have the required “white neutral” at the box. Instead, my switch was wired like
this:
Solution? Pretty much the same as above. I connected the two “traveler wires”
(the pair connected at the top of the switch) to the two traveler wires (red
and blue) on the Wemo. I connected the white Wemo wire and the green Wemo wire
to the ground to the ground wire in my box. I connected the black Wemo wire to the Line wire (connected to the bottom screw
on the old switch). Genie Garage
Door Opener Hack I
purchased a Genie Powerlift 900 ½ HP screw garage door opener. It was a pain to install and replace
the 25 year old Crusader Model 200SS unit that came with the house. The Genie comes with a very large
wall-mount console as pictured here on the left:
Since
I have 3 garage door openers and a rolling gate, I have 4 push buttons
mounted in a neat row on the wall of the garage. There wasn’t any room for a
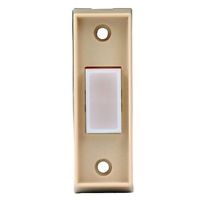
clean install of the Genie “monster” lighted console. I
purchased, at Home Depot, a Genie push button switch as pictured above,
right. But it did not work with the
Series 3 Powerlift. It took a few
calls to find someone at Genie that explained that there was no push button
remote that was compatible. The
Genie lighted three-button wall mount console is NOT a simple relay. The inputs to the garage door opener can’t
be simply shorted to open and close the door. Instead, the console sends some kind
of code over the 2 wires to the opener to turn on the light and open and
close the door. The
“lock” function seems to also set a mode in the opener. But I
found a web site, which I can no longer find, that gave me the information to
solve the problem. When you open
the Genie console remote and look at the circuit board there are two small
holes in the circuit board in the upper left corner. These two pads provide a relay port
for the console though they are not brought out of the case. So I
connected the twisted pair to the old relay switch and put back in line on
the wall. I soldered a pair of
wires to the two circuit board holes, brought the wire out and put the Genie
console back together. I mounted
the console (using some zip ties) up near the garage door motor and connected
it to the opener. I tested it,
and it controlled the door fine.
Then I connected the twisted pair from the wall-mounted relay to the
pair that I brought out of the console, and the old simple relay now works to
open and close the garage door. Now,
with the simply relay working, I could readily connect it to any home
automation system using that same pair of wires I brought out in parallel
with the wall button. Another
trick about Genie Door Limit
Adjustments. Be very careful
that you don’t let the screw-drive and motor over push the down-limit
adjust on the door. I made this
mistake and the opener turned the connecting parts between the trolley and
the door into twisted metal bars.
I suggest that you set the down limit well above the fully closed
position, then set the up limit with some room to spare, too. Then traverse the door a few times and
see how it does. Be ready to
unplug or reverse the door quickly though in case it tries to over-limit the
door at either end. Then when you
are comfortable with it, set the down limit more fully closed and set the up limit to its fully up position. If the door ever jams going up or down
and the trolley “skips” while the screw is turning, the limits
will be out of adjustment and you MUST reset them again. Or again, they will crush your
mounting hardware or break something else. Wansview
W3 (X Series) camera and Blue Iris Pro v3.66 Purchased
a new Wansview security camera to replace my old Wansview Model NCM621W. I went to install it in Blue Iris Pro
v3.66 (the PC software I use to record the security camera video) but I found
that there was not a compatible model supported by this old version of Blue
Iris. After
a good deal of playing around, some research, and some luck I found that I
could get it work using the following settings: ·
Make/Model: RTSP H.264/MJPG/MPEG4 ·
Video path: /live/ch0 Of
course all the other easy settings have to be right; username/password, IP
address, ports, etc. The
W3 is a 720P outdoor camera. It
works fine. I found that it has a
much wider horizontal field of view than the NCM621W. So I was able to use the “area
of interest” setting in Blue Iris to reduce the amount of data that I
was recording. This W3 is also
much smaller than the NCW621W. About Vision Bios Contact News Delivering Customer Satisfaction, Always |
|
|